뷰에 배치된 위젯이 화면에 나타나는 방식을 지정한다.
엄밀히 말하면 레이이웃은 사용자 UI를 Activity 클래스에 나타내는 아키텍처이다. 배치 구조를 정의하고 사용자에게 나타내는 모든 엘리먼트를 담고 있다. 레이아웃은 두 가지 방법으로 정의할 수 있다:
• XML 파일에서 UI 요소를 정의한다. 위젯이나 레이아웃 등과 같은 View 클래스 또는 그 서브클래스를 이용하여 정의하는 방법이다.
• 실행시에 레이아웃 엘리먼트를 인스턴스화한다. 애플리케이션에서는 프로그램으로 View 나 ViewGroup 객체를 생성(및 그 속성을 정의)할 수 있다.
안드로이드 프레임웍은 UI를 구성하는데 이 중 한 가지나 두 가지를 합한 방식 모두를 지원한다. 예를 들어, 애플리케이션의 스크린 엘리먼트 등의 디폴트 레이아웃은 XML에 정의하고, 그 객체의 상태를 변경시키거나 객체를 추가하는 일은 코드 부분에 넣는 것어서 실행시에 나타나게 하는 것이 가능하다.
주요 뷰 그룹(뷰그룹과 레이아웃 클래스는 유사 개념)
주요 뷰 그룹 요약-다음에 열거하는 뷰 그룹 객체는 모두 자식UI엘리먼트를 갖고 있다. 어떤 것은 화면에 나타나는 UI에 대한 형태를 지정하고, 어떤 것은 자식 뷰들의 배치를 관리하는 구조만을 결정한다.
FrameLayout: 한 개 객체만을 보여주는 뷰 프레임을 설정.
Gallery: 한정된 리스트 내의 이미지를 좌우로 스크롤해서 보여주는 프레임.
GridView: m개 칼럼, n개 로우를 스크롤 가능한 그리드로 보여줌.
LinearLayout: 자식 뷰들을 하나의 수평 또는 수직 화면으로 구성하는 레이아웃. 이 레이아웃은 화면 크기보다 윈도우의 크기가 크면 스크롤바를 생성한다.
ListView: 상하 스크롤 가능한 목록을 만들어준다.
RelativeLayout: 자식 객체의 상호 관계(B객체의 좌측에 A객체 배치) 또는 자식과 부보의 관계(부모의 위에 배치)형태로 뷰의 위치를 지정하도록 한다.
ScrollView: 목록이 아닌 객체에 대해서 상하 스크롤바가 생기도록 한다.
Spinner: 지정된 목록의 한 개 항목을 하나의 텍스트박스 형태로 표시한다. 수평 혹은 수직으로 스크롤할 수 있는 리스트박스와 유사하다.
SurfaceView: 그리기 화면에 대한 직접 액세스를 제공한다. 화면의 위에 자식 뷰를 얹을 수는 있지만, 위젯보다는 그림 픽셀을 그릴 필요가 있을 때 사용하도록 하는 목적으로 제공되는 기능이다.
TabHost: 탭 선택 형태를 제공하는 뷰그룹으로 탭을 클릭하면 애플리케이션이 다른 화면으로 변경되도록 하는 기능을 제공한다.
TableLayout: 지정된 행과 열을 구성하도록 하는 테이블 형태 레이아웃으로, 각 셀은 각각의 위젯을 가질 수 있다. 행의 크기를 가장 큰 셀의 크기에 맞춰진다. 셀 경계선은 나타나지 않는다.
ViewFlipper: 한 개 텍스트박스 안에 한 번에 하나의 항목을 보여주는 목록을 가진 객체. 슬라이드 쇼처럼 지정된 시간 간격마다 스와핑이 되도록 설정할 수 있다.
ViewSwitcher: ViewFlipper와 동일.
FrameLayout
가장 단순한 형태의 레이아웃 객체이다. 기본적으로 스크린상의 빈 공간이며 나중에 하나의 객체로 화면을 채울 수 있다. 이 프레임 레아이웃의 모든 차일드 엘리먼트는 화면의 좌상단에 고정된다; 다른 위치를 지정할 수는 없다. 차일드 뷰들은 이전 뷰 위에 차례로 그려진다.
LinearLayout
LinearLayout은 모든 자식뷰들을 한 방향으로 배치한다. 하지만 기본 방향이나 여백을 다음 다섯 가지 프로퍼티를 통해 지정할 수 있다.
- orientation: android:orientation 프로퍼티를 horizontal이나 vertical 로 지정할 수 있다. 또는 코드에서 setOrientation() 메쏘드에서 HORIZONTAL/VERTICAL로 지정할 수 있다.
- fill model: pixel 수, wrap_content, fill_parent 등으로 설정.
- weight: widget의 중요도를 1,2 등으로 줄 수 있다.
- gravity:android:layout_gravity 프로퍼티를 left, center_horizontal, right로 줄 수 있다.
- padding:android:padding으로 전체 패딩을 지정한다. 하지만 각 영역별로 지정하려면 android:paddingLeft, android:paddingRight, android:paddingTop, android:paddingBottom을 사용한다.
ex) 텍스트뷰, 버튼을 배치한 LinearLayout
<?xml version="1.0" encoding="utf-8"?>
<LinearLayout xmlns:android="http://schemas.android.com/apk/res/android"
android:layout_width="fill_parent"
android:layout_height="fill_parent"
android:orientation="vertical" >
<TextView android:id="@+id/text"
android:layout_width="wrap_content"
android:layout_height="wrap_content"
android:text="Hello, I am a TextView" />
<Button android:id="@+id/button"
android:layout_width="wrap_content"
android:layout_height="wrap_content"
android:text="Hello, I am a Button" />
</LinearLayout>
TableLayout
TableLayout은 그 자식들을 행과 열로 배치한다. 하지만 행,열, 또는 셀에 대한 경계선은 보여주지 않는다. 테이블은 빈 셀을 가질 수 있지만, HTML에서처럼 칼럼 영역을 넘어설 수는 없다.
ex) 2x2 테이블 레이아웃
<?xml version="1.0" encoding="utf-8"?>
<TableLayout xmlns:android="http://schemas.android.com/apk/res/android"
android:layout_width="fill_parent"
android:layout_height="fill_parent"
android:stretchColumns="1">
<TableRow>
<TextView
android:text="@string/table_layout_4_open"
android:padding="3dip" />
<TextView
android:text="@string/table_layout_4_open_shortcut"
android:gravity="right"
android:padding="3dip" />
</TableRow>
<TableRow>
<TextView
android:text="@string/table_layout_4_save"
android:padding="3dip" />
<TextView
android:text="@string/table_layout_4_save_shortcut"
android:gravity="right"
android:padding="3dip" />
</TableRow>
</TableLayout>
RelativeLayout
RelativeLayout 은 자식뷰가 자신의 위치를 부모 또는 다른 뷰에 대한 상대적 위치로 지정한다. 그래서 두 엘리먼트를 오른쪽으로 또는 하나가 다른 뷰의 아래에 있도록, 화면의 중앙, 중앙 왼쪽 등으로 지정할 수 있다. 엘리먼트는 주어진 순서에 따라 그려지므로, 첫 번째 엘리먼트가 화면의 중앙에 그려진다면, 다른 엘리먼트는 중앙 엘리먼트에 대해 배치되므로 화면 중앙에 대한 상대적 위치로 그려진다. 또한, 이런 순서 때문에, 이 레이아웃을 정하는데 XML을 사용한다면, 참조할 엘리먼트는 (다른 뷰 객체를 배치하기 위해) 참조ID로 다른 뷰를 참조하기 전에 미리 XML 파일에 나타나 있어야 한다.
정의된 RelativeLayout의 파라메터는: width, height, below, alignTop, toLeft, padding[Bottom|Left|Right|Top], margin[Bottom|Left|Right|Top] 등이 있다.
ex) 텍스트뷰, 버튼을 배치한 RelativeLayout
<?xml version="1.0" encoding="utf-8"?>
<RelativeLayout xmlns:android="http://schemas.android.com/apk/res/android
android:layout_width="fill_parent"
android:layout_height="wrap_content"
android:background="@drawable/blue"
android:padding="10px" >
<TextView android:id="@+id/label"
android:layout_width="fill_parent"
android:layout_height="wrap_content"
android:text="Type here:" />
<EditText android:id="@+id/entry"
android:layout_width="fill_parent"
android:layout_height="wrap_content"
android:background="@android:drawable/editbox_background"
android:layout_below="@id/label" />
<Button android:id="@+id/ok"
android:layout_width="wrap_content"
android:layout_height="wrap_content"
android:layout_below="@id/entry"
android:layout_alignParentRight="true"
android:layout_marginLeft="10px"
android:text="OK" />
<Button android:layout_width="wrap_content"
android:layout_height="wrap_content"
android:layout_toLeftOf="@id/ok"
android:layout_alignTop="@id/ok"
android:text="Cancel" />
</RelativeLayout>
AbsoluteLayout
절대좌표 형태로 뷰의 위치를 지정하는 방식이다. 아주 쉽게 화면에 뷰를 배치할 수 있지만, 안드로이드 단말기의 해상도가 워낙 다양하므로 가급적 사용하지 않는 것이 좋다.
며칠 전 Google에서 AbsoluteLayout 엘리먼트를 deprecate 하겠다고 밝혔다. 즉, 이후 SDK 버전에서는 이 레이아웃을 사용할 수 없다는 의미이다. 역시, 사용하지 않는 것이 좋겠다.
TabHost
탭메뉴 형태의 화면을 만들 때 TabHost 를 이용한다.
ex) 탭별 화면을 정적으로 구성할 경우의 TabHost
<?xml version="1.0" encoding="utf-8"?>
<TabHost
xmlns:android="http://schemas.android.com/apk/res/android"
android:id="@android:id/tabhost"
android:layout_width="fill_parent"
android:layout_height="fill_parent">
<LinearLayout
android:orientation="vertical"
android:layout_width="fill_parent"
android:layout_height="fill_parent">
<TabWidget
android:id="@android:id/tabs"
android:layout_width="fill_parent"
android:layout_height="wrap_content" />
<FrameLayout
android:id="@android:id/tabcontent"
android:layout_width="fill_parent"
android:layout_height="fill_parent">
<TextView
android:id="@+id/textview1"
android:layout_width="fill_parent"
android:layout_height="fill_parent"
android:text="this is a tab" />
<TextView
android:id="@+id/textview2"
android:layout_width="fill_parent"
android:layout_height="fill_parent"
android:text="this is another tab" />
<TextView
android:id="@+id/textview3"
android:layout_width="fill_parent"
android:layout_height="fill_parent"
android:text="this is a third tab" />
</FrameLayout>
</LinearLayout>
</TabHost>
ex) 탭별 화면을 동적으로 구성할 경우의 TabHost
<?xml version="1.0" encoding="utf-8"?>
<TabHost xmlns:android="http://schemas.android.com/apk/res/android"
android:id="@android:id/tabhost"
android:layout_width="fill_parent"
android:layout_height="fill_parent">
<LinearLayout
android:orientation="vertical"
android:layout_width="fill_parent"
android:layout_height="fill_parent"
android:padding="5dp">
<TabWidget
android:id="@android:id/tabs"
android:layout_width="fill_parent"
android:layout_height="wrap_content" />
<FrameLayout
android:id="@android:id/tabcontent"
android:layout_width="fill_parent"
android:layout_height="fill_parent"
android:padding="5dp" />
</LinearLayout>
</TabHost>
* FrameLayout 내에 TextView 가 없으므로 화면을 나타내려면 코드 요소에서 intent를 사용하여 나타나도록 해야 한다.
ScrollView
ex) 스크롤뷰 설정 기본 예
<?xml version="1.0" encoding="utf-8"?>
<ScrollView
xmlns:android="http://schemas.android.com/apk/res/android"
android:layout_width="fill_parent"
android:layout_height="wrap_content">
<TableLayout
android:layout_width="fill_parent"
android:layout_height="fill_parent"
android:stretchColumns="0">
<TableRow>
<View
android:layout_height="80px"
android:background="#000000"/>
<TextView android:text="#000000"
android:paddingLeft="4px"
android:layout_gravity="center_vertical" />
</TableRow>
<TableRow>
<View
android:layout_height="80px"
android:background="#440000" />
<TextView android:text="#440000"
android:paddingLeft="4px"
android:layout_gravity="center_vertical" />
</TableRow>
<TableRow>
<View
android:layout_height="80px"
android:background="#884400" />
<TextView android:text="#884400"
android:paddingLeft="4px"
android:layout_gravity="center_vertical" />
</TableRow>
<TableRow>
<View
android:layout_height="80px"
android:background="#aa8844" />
<TextView android:text="#aa8844"
android:paddingLeft="4px"
android:layout_gravity="center_vertical" />
</TableRow>
<TableRow>
<View
android:layout_height="80px"
android:background="#ffaa88" />
<TextView android:text="#ffaa88"
android:layout_gravity="center_vertical" />
</TableRow>
<TableRow>
<View
android:layout_height="80px"
android:background="#ffffff" />
<TextView android:text="#ffffff"
android:paddingLeft="4px"
android:layout_gravity="center_vertical" />
</TableRow>
</TableLayout>
</ScrollView>
GridView
ex) 그리드뷰 기본 설정 예
<?xml version="1.0" encoding="utf-8"?>
<LinearLayout
xmlns:android="http://schemas.android.com/apk/res/android"
android:orientation="vertical"
android:layout_width="fill_parent"
android:layout_height="fill_parent"
>
<TextView
android:id="@+id/selection"
android:layout_width="fill_parent"
android:layout_height="wrap_content"
/>
<GridView
android:id="@+id/grid"
android:layout_width="fill_parent"
android:layout_height="fill_parent"
android:verticalSpacing="35px"
android:horizontalSpacing="5px"
android:numColumns="auto_fit"
android:columnWidth="100px"
android:stretchMode="columnWidth"
android:gravity="center"
/>
</LinearLayout>
import android.app.Activity;
import android.content.Context;
import android.os.Bundle;
import android.view.View;
import android.view.ViewGroup;
import android.widget.ArrayAdapter;
import android.widget.GridView;
import android.widget.TextView;
import android.widget.AdapterView;
public class GridDemo extends Activity
implements AdapterView.OnItemSelectedListener {
TextView selection;
String[] items={"lorem", "ipsum", "dolor", "sit", "amet",
"consectetuer", "adipiscing", "elit", "morbi", "vel",
"ligula", "vitae", "arcu", "aliquet", "mollis",
"etiam", "vel", "erat", "placerat", "ante",
"porttitor", "sodales", "pellentesque", "augue", "purus"};
public void onCreate(Bundle icicle) {
super.onCreate(icicle);
setContentView(R.layout.grid);
selection=(TextView)findViewById(R.id.selection);
GridView g=(GridView) findViewById(R.id.grid);
g.setAdapter(new FunnyLookingAdapter(this,
android.R.layout.simple_list_item_1,items));
g.setOnItemSelectedListener(this);
}
public void onItemSelected(AdapterView parent, View v, int position, long id) {
selection.setText(items[position]);
}
public void onNothingSelected(AdapterView parent) {
selection.setText("");
}
private class FunnyLookingAdapter extends ArrayAdapter {
Context ctxt;
FunnyLookingAdapter(Context ctxt, int resource, String[] items) {
super(ctxt, resource, items);
this.ctxt=ctxt;
}
public View getView(int position, View convertView, ViewGroup parent) {
TextView label=(TextView)convertView;
if (convertView==null) {
convertView=new TextView(ctxt);
label=(TextView)convertView;
}
label.setText(items[position]);
return(convertView);
}
}
}
뷰그룹 객체의 속성 지정
Attribute
모든 View와 ViewGroup 객체는 자신의 다양한 XML 속성을 지원한다. 어떤 속성은 특정 View 객체에 한정되지만(예를 들어 TextView 는 textSize 속성을 지원), 이들 속성은 View 객체에서 상속된 것이고, 따라서 모든 View 객체의 공통속성들이 있다. 그리고, "layout parameter" 로 간주되는 속성이 있으며, 이것은 ViewGroup 객체에 의해 정의된 View 객체의 레이아웃 상의 특정 위치를 지정하는 속성이다.
ID: 모든 뷰 객체는 xml 트리상에서 자신을 고유하게 식별하는 정수값 ID를 가질수 있다. XML 태그 안의 ID의 신택스는 다음과 같다:
android:id="@+id/my_button"
문자열 시작 위치에 있는 @ 기호는 XML 해석기가 나머지 DI 문자열을 해석하고 그것을 ID 자원으로 가져가야 한다는 의미이다. + 기호는 이것이 새로운 자원이며 따라서 애플리케이션의 리소스(R.java 파일)에 생성하고 추가해야 한다는 의미이다. 그 외에도 안드로이드 프레임웍이 제공하는 많은 ID 자원들이 있다. 안드로이드 자원 ID를 참조할 때는 더하기 기호를 사용할 필요가 없고, 대신에 다음과 같이 안드로이드 패키지 네임스페이스를 추가해야 한다:
android:id="@android:id/empty"
안드로이드 패키지 네임스페이스를 사용함으로써, 로컬 리소스 클래스가 아닌 android.R 리소스 클래스를 참조하게 된다.
뷰를 생성하고 애플리케이션에서 그것을 참조하려면 통상적인 패턴은:
1. 레이아웃 파일에 뷰/위젯을 정의하고 거기에 고유한 ID를 할당한다:
2. <Button android:id="@+id/my_button"
3. android:layout_width="wrap_content"
4. android:layout_height="wrap_content"
android:text="@string/my_button_text"/>
5. 다음에 뷰 객체의 인스턴스를 생성하고 레이아웃에서 그것을 찾아낸다(보통 onCreate() method 안에서 코딩):
Button myButton = (Button) findViewById(R.id.my_button);
ID는 전체 XML 트리 안에서 고유할 필요는 없지만, 검색하고 있는 트리 안(이것이 전체 트리가 될 수 있으므로, 가능하다면 완전히 고유하도록 정하는 것이 좋다)에서는 고유해야 한다.
Layout Parameters: layout_something 형태의 XML 레이아웃 속성이 View에 대한 레이아웃 파라메터이다. 모든 ViewGroup 클래스는 ViewGroup.LayoutParams 를 상속하는 네스티드 클래스를 구현한다. 이 서브클래스에는 각 차일드 뷰의 크기와 위치를 정의하는 속성이 들어 있다. 각 부모 뷰 그룹은 각 자식 뷰의 레이아웃 파라메터를 결정한다.(레이아웃 파라메터 상속 그림 참조)
모든 LayoutParams 서브클래스는 값을 설정하는 자신의 신택스를 갖고 있다. 각 차일드 엘리먼트는 부모에게 맞는 LayoutParams를 정의해야 한다. 하지만 이것은 자신의 차일드를 위해 다른 LayoutParams로 정의할 수도 있다.
모든 뷰 그룹에는 layout_width and layout_height이 포함되어 있고, 각 뷰는 이것을 정의해야 한다. 많은 LayoutParams에는 선택사항인 margin과 border도 포함되어 있다. 정확한 width, height 수치를 지정할 수도 있다. 부모와의 상대적 크기인 wrap_content, fill_parent 로 지정하는 것을 더 권장한다.
ex) LayoutParams 속성 지정
<?xml version="1.0" encoding="utf-8"?>
<!-- res/main_screen.xml -->
<LinearLayout xmlns:android="http://schemas.android.com/apk/res/android"
android:orientation="vertical" // The object's own orientation property
android:padding="4" // Inherited View property
android:gravity="center" // The object's own property
android:layout_width="fill_parent" // Parent object's LinearLayout.LayoutParams.width
android:layout_height="fill_parent"> // Parent object's LinearLayout.LayoutParams.height
<TextView android:layout_width="fill_parent" // TextView.LayoutParams.width
android:layout_height="wrap_content" // TextView.LayoutParams.height
android:layout_weight="0" // TextView.LayoutParams.weight
android:paddingBottom="4" // TextView.paddingBottom
android:text="@string/redirect_getter"/> // TextView.text
<EditText android:id="@+id/text"
android:layout_width="fill_parent" // EditText.LayoutParams.width
android:layout_height="wrap_content" // EditText.LayoutParams.height
android:layout_weight="0" // EditText.LinearLayoutParams.weight
android:paddingBottom="4"> // EditText.paddingBottom
<requestFocus />
</EditText>
<Button android:id="@+id/apply"
android:layout_width="wrap_content" // Button.LayoutParams.width
android:layout_height="wrap_content" // Button.LayoutParams.height
android:text="@string/apply" /> // TextView.text
</LinearLayout>
Position
뷰의 표시영역은 사각형이다. 뷰는 왼쪽 최상단을 나타내는 로케이션과, 넓이와 높이를 나타내느 디멘전을 갖고 있다. 로케이션과 디멘전의 단위는 픽셀이다.
getLeft와 getTop 메쏘드를 사용하여 뷰의 위치를 알아낼 수 있다. getLeft는 사각형의 왼쪽 위치 즉 X좌표를 돌려주고, getTop은 사각형의 최상단, 즉 Y좌표를 돌려준다. 이들 메쏘드는 모두 부모 뷰에 대한 상대적 위치로 좌표를 돌려준다. 예를 들어 getLeft()가 20으로 나오면, 이것은 그 뷰가 부모 뷰의 왼쪽 끝에서 오른쪽으로 20 픽셀 이동한 위치에 있다는 의미이다.
이외에도 getRight, getBottom 등 유용한 메쏘드들이 있다. 사용예로는, getRight() 를 쓰면 getLeft() + getWidth() 를 계산한 것과 같은 결과를 받는다.
Size, Padding, Margin
뷰의 크기는 넓이와 높이로 표현된다. 실제로 뷰는 넓이와 높이 값의 두 쌍을 갖고 있다.
첫번째 쌍은 측정 넓이와 높이라 한다. 이 디멘전은 그 뷰가 부모 뷰 안에서 얼마나 크게 나타날지를 정한다. 이 측정 디멘전은 getMeasuredWidth() 와 getMeasuredHeight()로 구할 수 있다.
두 번째 쌍은 단순한 넓이와 높이 또는 드로잉 넓이와 드로잉 높이이다. 이 디멘전은 화면에서의 실제 뷰의 크기를 정의한다. 이 값은 측정 넓이, 높이와 다를 수 있다. 이 값은 getWidth() 와 getHeight() 메쏘드로 구할 수 있다.
디멘전을 측정하기 위해 뷰는 패딩을 고려한다. 패딩은 뷰의 왼쪽,상단,우측,하단 부분에 대한 픽셀값으로 표현된다. 패딩은 뷰의 내용을 특정 픽셀만큼 떨어져서 표현할 때 사용할 수 있다. 예를 들어, 왼쪽 패딩 2 를 하면 뷰의 내용이 왼쪽 끝에서 2 픽셀만큼 떨어져서 나타난다. 패딩을 설정하려면 setPadding(int, int, int, int) 메쏘드를 이용하고, getPaddingLeft(), getPaddingTop(), getPaddingRight(), getPaddingBottom() 메쏘드로 조회할 수 있다.
뷰는 패딩을 정할 수 있지만, 마진은 전혀 지원하지 않는다. 하지만 뷰 그룹은 지원한다.
2010년 10월 28일 목요일
자원요소-기본자원
기본자원에는 문자열, 문자열배열, 색상, 디멘젼, 단순표시물, 비트맵그래픽, 애니메이션 시퀀스, 메뉴파일, XML 파일, raw 파일, 레이아웃 파일, 스타일, 테마, Asset 자원, Searchable 등이 있다.
문자열
필수디렉토리 파일명(권장)
/res/values/ strings.xml
Strings를 리소스로 저장하고 참조할 수 있다. 스트링을 포맷팅하려면 세 가지 HTML tag를 사용할 수 있다: <b>, <i>, and <u>.
스타일이 적용되지 않은 텍스트만을 얻으려면 CharSequence 객체에 toString() 메쏘드를 호출하면 된다. 문자열 자원을 수용하는 메쏘드를 만들려면 앞서 정의한 태그들을 처리할 수 있어야 한다.
자바 코드로 이 자원에 접근하려면 Resources.getString() 이나 Resources.getText() 메쏘드를 사용한다.
Syntax
<string name=string_name>string_value</string>
Resource reference name:
• Java: R.string.some_name
• XML: @[package:]string/some_name (where some_name is the name of a specific string)
ex) 문자열 자원 정의 기본 예
<string name="good_example">"This'll work"</string>
<string name="good_example_2">This\'ll also work</string>
<string name="bad_example">This won't work!</string>
<string name="bad_example_2">XML encodings won't work either!</string>
ex) 포맷된 문자열 정의
<resources>
<string name="simple_welcome_message">Welcome!</string>
<string name="styled_welcome_message">We are <b><i>so</i></b> glad to see you.</string>
</resources>
ex) strings.xml에 정의된 문자열 자원을 참조
<TextView android:layout_width="fill_parent"
android:layout_height="wrap_content"
android:textAlign="center"
android:text="@string/simple_welcome_message"/>
문자열 배열
필수디렉토리 파일명(권장)
/res/values/ arrays.xml
ex) 문자열 배열 정의
<resources>
<array name="honorifics">
<item>Dr.</item>
<item>Mr.</item>
<item>Mrs.</item>
<item>Ms.</item>
</array>
</resources>
* 위 자원을 자바 코드에서 사용하려면
getResources.getStringArray(R.array.honorifics);
색상
필수디렉토리 파일명(권장)
/res/values/ colors.xml
color drawables 와 color string 값을 저장하는데 사용하며, 이 자원에 접근하려면 각각 Resources.getDrawable() 와 Resources.getColor() 을 사용한다.
Syntax
<color name=color_name>#color_value</color>
Resource reference name:
• Java: R.color.some_name
• XML: @[package:]color/some_name (some_name 은 특정 색상의 이름)
ex) 색상 정의
<resources>
<color name="opaque_red">#f00</color>
<color name="translucent_red">#80ff0000</color>
</resources>
ex) 다른데서 정의된 색상을 참조
<TextView android:layout_width="fill_parent"
android:layout_height="wrap_content"
android:textAlign="center"
android:textColor="@color/translucent_red"
android:text="Some Text"/>
// 이것을 호출하는 Java 코드인 경우는 다음과 같다.
int color = getResources.getColor(R.color.opaque_red);
디멘젼
필수디렉토리 파일명(권장)
/res/values/ dimen.xml
Syntax
<dimen name=dimen_name>dimen_value</dimen>
Resources.getDimension()
Resource reference name:
• Java: R.dimen.some_name
• XML: @[package:]dimen/some_name (여기서 some_name은 특정 <dimen> 엘리먼트의 이름)
px : Pixels 실제화면의 픽셀을 말한다. 예:20 px
in : Inches 물리적길이 예:5in
mm : Millimeters 물리적길이 예:3mm
Pt : Points 글자크기단위 예:14pt
dp : Density-independent Pixels 160dpi 화면을 기준으로 한 픽셀단위 예:8dp
sp : Scale-independent Pixels 가변글꼴 표시에 최적임 예:14sp
ex) 기본 디멘젼 정의
<resources>
<dimen name="one_pixel">1px</dimen>
<dimen name="double_density">2dp</dimen>
<dimen name="sixteen_sp">16sp</dimen>
</resources>
ex) 디멘젼 자원 참조
// Example Java code:
float dimen = Resources.getDimen(R.dimen.one_pixel);
// Example XML code:
<TextView android:layout_width="fill_parent"
android:layout_height="wrap_content"
android:textSize="@dimen/sixteen_sp"/>
단순표시물
필수디렉토리 파일명(권장)
/res/values/ drawables.xml
색상있는 사각형 등 PaintDrawable 객체를 자원으로 정의해서 사용할 수 있다.
Syntax
<drawable name=color_name>color_value</drawable>
Resource reference name:
• Java: R.drawable.some_name
• XML: @[package:]drawable/some_name (여기서 some_name은 특정 자원의 이름)
ex) 단순표시물 정의
<resources>
<drawable name="solid_red">#f00</drawable>
<drawable name="solid_blue">#0000ff</drawable>
<drawable name="solid_green">#f0f0</drawable>
</resources>
solid_red.xml 파일에 위 코드를 저장
ex) 단순표시물 참조
// Assign a PaintDrawable as the background to
// a TextView on the current screen.
Drawable redDrawable = Resources.getDrawable(R.drawable.solid_red);
TextView tv = (TextView)findViewByID(R.id.text);
tv.setBackground(redDrawable);
Example XML code
<TextView android:layout_width="fill_parent"
android:layout_height="wrap_content"
android:textAlign="center"
android:background="@drawable/solid_red"/>
비트맵 그래픽
필수디렉토리: /res/drawable/
지원형식: 9.png, png (preferred), jpg (acceptable), gif (discouraged)
이 유형의 자원에 액세스하려면 Resources.getDrawable() 또는 mContext.getResources().getDrawable(R.drawable.imageId) 메쏘드를 사용한다.
Resource reference name:
• Java: R.drawable.some_file
• XML: @[package:]drawable/some_file
참고) 이미지를 비트맵으로 변환하기 위해 비트 스트림으로 저장하려 한다면, 그 이미지를 res/raw/ 폴더에 저장하면 최적화되지 않은 채로 컴파일된다.
애니메이션 시퀀스
필수디렉토리
/res/anim/
rame by frame animation 또는 tweened animation 객체로 컴파일된 XML 파일을 저장한다.
Resource reference name:
• Java: R.anim.some_file
• XML: @[package:]anim/some_file
ex) 트윈드 애니메이션 정의
<set android:shareInterpolator=boolean> // Only required if multiple tags are used.
<alpha android:fromAlpha=float
android:toAlpha=float > |
<scale android:fromXScale=float
android:toXScale=float
android:fromYScale=float
android:toYScale=float
android:pivotX=string
android:pivotY=string > |
<translate android:fromX=string
android:toX=string
android:fromY=string
android:toY=string > |
<rotate android:fromDegrees=float
android:toDegrees=float
android:pivotX=string
android:pivotY=string > |
<interpolator tag>
<set>
</set>
메뉴 파일
필수디렉토리: /res/menu/
Resource reference name:
• Java: R.menu.some_file
ex) 옵션메뉴 만들기
<menu xmlns:android="http://schemas.android.com/apk/res/android">
<item android:id="@+id/new_game"
android:title="New Game" />
<item android:id="@+id/quit"
android:title="Quit" />
</menu>
ex) 그룹이 있는 옵션메뉴 만들기
<menu xmlns:android="http://schemas.android.com/apk/res/android">
<item android:id="@+id/example_item
android:title="Example Item"
android:icon="@drawable/example_item_icon" />
<group android:id="@+id/example_group">
<item android:id="@+id/example_item2
android:title="Example Item 2"
android:icon="@drawable/example_item2_icon" />
</group>
<item android:id="@+id/example_submenu
android:title="Example Sub Menu" >
<menu>
<item android:id="@+id/example_submenu_item
android:title="Example Sub Menu Item" />
</menu>
</item>
</menu>
XML 파일
필수디렉토리
/res/xml/
Resources.getXML()
Raw 파일
필수디렉토리
/res/raw/
Resources.openRawResource(R.raw.somefilename);
레이아웃 파일
필수디렉토리: /res/layout/
Resource reference name:
• Java: R.layout.some_file
• XML: @[package:]layout/some_file
레이아웃 자원 참조 자바 코드:
setContentView(R.layout.main_screen);
Syntax
<ViewGroupClass xmlns:android="http://schemas.android.com/apk/res/android"
android:id="@+id/string_name" (attributes)>
<위젯 또는 기타 네스트된 ViewGroupClass>+
<requestFocus/>(레이아웃 파일당 0또는 1개 지정가능하고, 어떤 엘리먼트든 할당 가능)
</ViewGroupClass>
엘리먼트 설명
<ViewGroupClass>
이 파일의 루트 엘리먼트는 하나만 설정할 수 있다. 루트 엘리먼트는 다른 엘리먼트를 담고 있는 ViewGroup 클래스일 수도 있고, 한 개의 객체일 경우에는 위젯(또는 커스텀 위젯)이 될 수도 있다. 디폴트로, 엘리먼트로서 안드로이드 위젯 또는 ViewGroup 클래스명(대소문자 구분함)을 사용할 수 있다. 유효하지 않은 네스팅이 될 수도 있으니(예를 들면, <ListLayout> 안에 <TextView> 엘리먼트를 네스팅할 수 없다) 주의가 필요하다.
<requestFocus>
View 객체에 속하는 엘리먼트는 어떤 것이든 이 빈 엘리먼트를 포함시킬 수 있다. 그 의미는 화면 생성시 초기에 이 엘리먼트의 부모 태그에 포커스 주도록 하는 것이다. 파일당 한 개만 지정할 수 있다.
스타일
필수디렉토리 파일명(권장)
/res/values/ styles.xml
스타일은 한 엘리먼트(예를 들어 TextView에 적용된 10 pt red Arial font)에 적용되는 한 가지 이상의 속성이다. 스타일은 레이아웃 XML 파일의 엘리먼트에 속성으로 적용될 수 있다.
테마
필수디렉토리 파일명(권장)
/res/values/ themes.xml
테마는 전체 화면에 적용되는 한 가지 이상의 속성이다.
예를 들어 테마를 정의하여 윈도우 프레임의 색상과 패널의 전,후면, 그리고 메뉴의 문자 크기와 색상에 적용하여 애플리케이션의 액티비티에 반영되도록 할 수 있다.
스타일은 개별자원에만 지정할 수 있는 반면, 테마는 뷰 전체에 대해 지정하여 사용할 수 있다.
AndroidManifest.xml 파일의 활동요소(<activity>)의 android:theme 특성에 지정하여 사용한다.
스타일/테마 작성 절차
1.res/values 디렉토리에 styles.xml 파일을 생성한다. 루트에 <resource> 노드를 추가한다.
2.각 스타일 또는 테마에 <style> 요소를 고유한 이름을 주어 생성하고 부모 속성이 있다면 지정한다. 이름은 코드에서 참조할 때 사용하며, 부모 속성은 상속받을 스타일을 지정하는 것이다.
3.<style> 요소 안에, 포맷 값을 <item> 요소로 선언한다.
4.그러면 이제 매니페스트 파일이나 애플리케이션 코드 등 다른 XML 자원에서 이 리소스를 참조할 수 있다.
ex) 테마 선언
<?xml version="1.0" encoding="utf-8"?>
<resources>
<style name="CustomTheme">
<item name="android:windowNoTitle">true</item>
<item name="windowFrame">@drawable/screen_frame</item>
<item name="windowBackground">@drawable/screen_background_white</item>
<item name="panelForegroundColor">#FF000000</item>
<item name="panelBackgroundColor">#FFFFFFFF</item>
<item name="panelTextColor">?panelForegroundColor</item>
<item name="panelTextSize">14</item>
<item name="menuItemTextColor">?panelTextColor</item>
<item name="menuItemTextSize">?panelTextSize</item>
</style>
</resources>
ex) 테마를 매니페스트 파일이 등록
<application ... android:theme="@style/CustomTheme"> <!-- 애플리케이션의 모든 액티비티 에 대해 이 테마가 적용됨 -->
ex) 액티비티에 다이얼로그 테마 적용
<activity ... android:theme="@android:style/Theme.Dialog">
ex) 프로그램 코드에 테마 적용
protected void onCreate(Bundle savedInstanceState) {
super.onCreate(savedInstanceState); ...
setTheme(android.R.style.Theme_Light);
setContentView(R.layout.linear_layout_3);
}
// setContentView(View)를 호출하기 전 또는 inflate(int,ViewGroup) 전에 setTheme을 설정해야 한다.
Searchable
디렉토리,파일명 : res/xml/searchable.xml
전체 시스템의 기능으로 검색이 나타나도록 하기 위해, 안드로이드 프레임워크는 검색결과가 나타나도록 하는 API를 제공하고 있다. 이 API로 검색이 invoke되고 검색 다이얼로그가 나타나는 방법, 가용한 검색결과의 유형, 그리고 결과의 제시 방법을 설정할 수 있다.
안드로이드 검색 프레임워크를 사용하려면, 애플리케이션은 XML 리소스 형태로 검색 구성을 설정해야 한다.
Resource reference name:
• Java: R.xml.filename.
• XML: @[package:]xml/filename (e.g., @xml/searchable).
2010년 10월 27일 수요일
2010년 10월 26일 화요일
안드로이드 설치
설치절차는
1. JDK 설치
2. 안드로이드 SDK 설치.
3. Eclipse 설치.
4. Eclipse 에 안드로이드 플러그인 설치
의 순서로 진행된다.
- 개발환경 요구사항
지원하는 운영체계
•Windows XP (32-bit) or Vista (32- or 64-bit) or Windows 7
•Mac OS X 10.4.8 or later (x86 only)
•Linux (tested on Linux Ubuntu Hardy Heron)
* 64 비트 판의 경우 32비트 애플리케이션을 구동할 수 있어야 한다. 32 비트 애플리케이션 지원을 추가하는 방법에 대해서는 Ubuntu Linux 애플리케이션 노트 참조.
지원 개발 환경
•Eclipse IDE
◦Eclipse 3.4 (Ganymede) or 3.5 (Galileo)
◦JDK 5 or JDK 6 (JRE 만으로는 충분하지 않음)
◦Android Development Tools plugin (optional)
◦Gnu Compiler for Java (gcj)와는 호환되지 않음.
•그 외 개발환경 또는 IDE
◦JDK 5 or JDK 6 (JRE 만으로는 충분하지 않음)
◦Apache Ant 1.6.5 or later for Linux and Mac, 1.7 or later for Windows
◦Gnu Compiler for Java (gcj)와는 호환되지 않음.
하드웨어 요구사항
• 기본 SDK 패키지로 600MB 디스크 공간이 요구되고, 각 플랫폼별로 SDK에 다운로드되는 라이브러리로 추가 100MB 이상 요구됨.
지원 운영체제는 다음과 같다.
- Windows XP 또는 Vista
- Mac OS X 10.4.8 이후(x86만)
- 리눅스(Ubuntu 6.06 LTS, Dapper Drake 에서 시험했음)
- JDK 설치
안드로이드 개발에 사용할 수 있는 Sun JDK 버전
- JDK 5
- JDK 6
JDK 다운로드
다운로드 된 JDK의 설치절차를 설명하면,
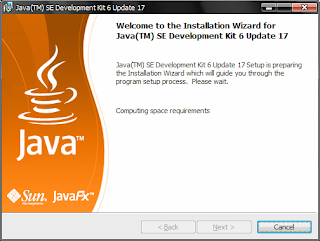
설치파일을 더블클릭하여 실행 한 후 Next를 눌러 다음 화면으로 넘어간다.
설치 경로를 확인한 후 Next 버튼을 눌러 다음 화면으로 넘어간다.
설치 진행화면이 나오고 설치가 완료되면 Finish 버튼을 눌러 설치를 완료한다.
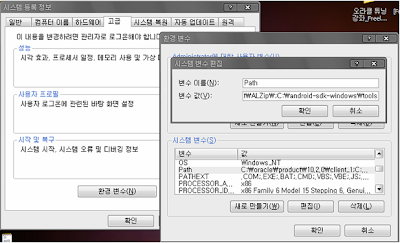
그 다음 할 일은 Path설정이다.
[내 컴퓨터] -> 마우스 우클릭 -> 속성 -> 고급 -> 환경 변수 -> 시스템 변수 -> Path 항목에 설치된 JDK의 bin 폴더 경로를 추가해준다.

- SDK 및 안드로이드 플러그인 설치
- 설치 파일: http://developer.android.com/sdk/installing.html
- API 소개: http://developer.android.com/reference/packages.html
다운 받은 android-sdk_r04-windows.zip 파일의 압축을 원하는 곳에 푼다.
이클립스 다운로드: http://www.eclipse.org/downloads/


이후 어플리케이션을 만들고 그것을 에뮬레이터에서 실행하면, 바로 위 화면에서 작성한 애플리케이션이 실행되게 된다.
1. JDK 설치
2. 안드로이드 SDK 설치.
3. Eclipse 설치.
4. Eclipse 에 안드로이드 플러그인 설치
의 순서로 진행된다.
- 개발환경 요구사항
지원하는 운영체계
•Windows XP (32-bit) or Vista (32- or 64-bit) or Windows 7
•Mac OS X 10.4.8 or later (x86 only)
•Linux (tested on Linux Ubuntu Hardy Heron)
* 64 비트 판의 경우 32비트 애플리케이션을 구동할 수 있어야 한다. 32 비트 애플리케이션 지원을 추가하는 방법에 대해서는 Ubuntu Linux 애플리케이션 노트 참조.
지원 개발 환경
•Eclipse IDE
◦Eclipse 3.4 (Ganymede) or 3.5 (Galileo)
◦JDK 5 or JDK 6 (JRE 만으로는 충분하지 않음)
◦Android Development Tools plugin (optional)
◦Gnu Compiler for Java (gcj)와는 호환되지 않음.
•그 외 개발환경 또는 IDE
◦JDK 5 or JDK 6 (JRE 만으로는 충분하지 않음)
◦Apache Ant 1.6.5 or later for Linux and Mac, 1.7 or later for Windows
◦Gnu Compiler for Java (gcj)와는 호환되지 않음.
하드웨어 요구사항
• 기본 SDK 패키지로 600MB 디스크 공간이 요구되고, 각 플랫폼별로 SDK에 다운로드되는 라이브러리로 추가 100MB 이상 요구됨.
지원 운영체제는 다음과 같다.
- Windows XP 또는 Vista
- Mac OS X 10.4.8 이후(x86만)
- 리눅스(Ubuntu 6.06 LTS, Dapper Drake 에서 시험했음)
- JDK 설치
안드로이드 개발에 사용할 수 있는 Sun JDK 버전
- JDK 5
- JDK 6
JDK 다운로드
다운로드 된 JDK의 설치절차를 설명하면,
설치파일을 더블클릭하여 실행 한 후 Next를 눌러 다음 화면으로 넘어간다.

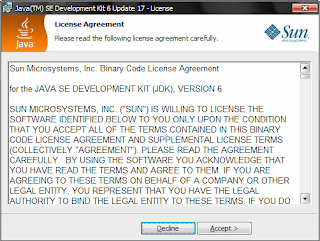
약관에 동의하며 Accept 버튼을 눌러 다음 화면으로 넘어간다.

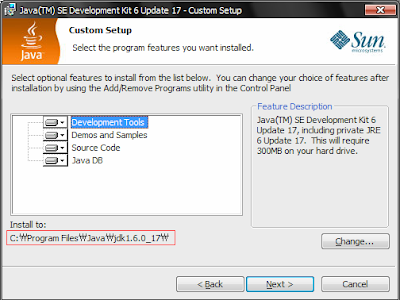
설치 경로를 확인한 후 Next 버튼을 눌러 다음 화면으로 넘어간다.

설치 진행화면이 나오고 설치가 완료되면 Finish 버튼을 눌러 설치를 완료한다.
그 다음 할 일은 Path설정이다.
[내 컴퓨터] -> 마우스 우클릭 -> 속성 -> 고급 -> 환경 변수 -> 시스템 변수 -> Path 항목에 설치된 JDK의 bin 폴더 경로를 추가해준다.

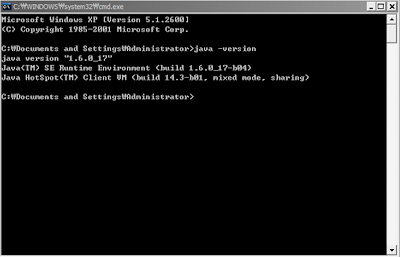
Path 설정을 마치면 JDK는 성공적으로 설치한 것이다.
확인을 위하여 커맨드 창(실행->cmd)에서 java의 버전을 확인하는 java -version 명령을 실행해본다.

- SDK 및 안드로이드 플러그인 설치
- 설치 파일: http://developer.android.com/sdk/installing.html
- API 소개: http://developer.android.com/reference/packages.html
다운 받은 android-sdk_r04-windows.zip 파일의 압축을 원하는 곳에 푼다.
보통 c:\android-sdk-windows 라는 path에 압축을 푼다.
앞의 JDK 설치하고 Path를 설정 했듯이 android sdk도 압축을 푼 디렉토리의 하위 tools 디렉토리를 path항목에 추가 시켜 준다. 이것은 나중에 tools에 있는 여러 유틸리티들을 간편하게 실행하기 위한 것이다.

이클립스 다운로드: http://www.eclipse.org/downloads/
다운 받은 Eclipse 압축파일(eclipse-java-galileo-SR1-win32.zip)을 원하는 위치에 압축을 푼다. 필자의 경우 c:\eclipse에 압축을 풀었다.
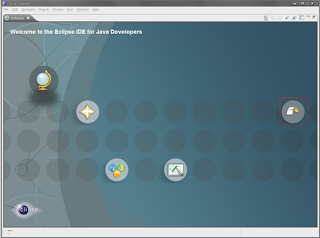
eclipse.exe 파일을 실행 시켜보면 아래와 같이 workspace 경로를 묻는 다이얼로그가 나타난다. 밑에 체크 박스를 체크하여 다음 실행시 부터는 workspace를 묻지 않게 할 수 있다. workspace는 eclipse에서 프로젝트를 생성하는 공간이라고 생각하면 된다.
임의대로 workspace 경로를 지정해준다. ( 기본설정은 c:\Documents And Settings\사용자이름\workspace 이다. )
임의대로 workspace 경로를 지정해준다. ( 기본설정은 c:\Documents And Settings\사용자이름\workspace 이다. )

workspace 경로를 지정한 후 아래와 같은 화면이 나타난다.
빨간색 네모칸의 버튼을 클릭하여 eclipse 작업화면(Workbench)으로 넘어간다.
빨간색 네모칸의 버튼을 클릭하여 eclipse 작업화면(Workbench)으로 넘어간다.

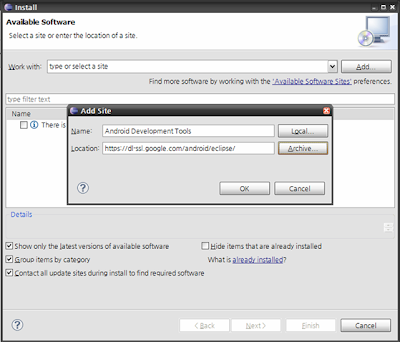
ADT(Android Development Tools) Plugin을 설치 해야한다.
Eclipse메뉴 중 Help->Install New Software 를 선택한다.
Eclipse메뉴 중 Help->Install New Software 를 선택한다.

Add 버튼을 클릭하고 나오는 'Add Site' 다이얼로그에서 아래 그림과 같이 입력하고 OK 버튼을 클릭한다. ( Location : https://dl-ssl.google.com/android/eclipse/ )

위 URL에서 설치할 수 있는 툴 목록을 가져온다.
Android DDMS, Android Development Tools 두개의 툴 모두 선택한 후 Next 버튼을 클릭한다.
Android DDMS, Android Development Tools 두개의 툴 모두 선택한 후 Next 버튼을 클릭한다.

툴의 의존성을 체크 한 후 문제가 없다면 계속 진행한다.
Next버튼을 눌러 License관련 화면이 나오고 빨간색 테두리의 license에 동의 한다는 메시지를 클릭한 후 Finish 버튼을 클릭하여 툴을 설치한다.
Next버튼을 눌러 License관련 화면이 나오고 빨간색 테두리의 license에 동의 한다는 메시지를 클릭한 후 Finish 버튼을 클릭하여 툴을 설치한다.
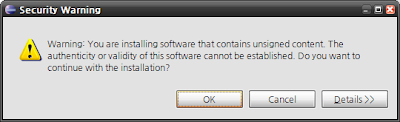
설치 도중 아래와 같이 Warning 메시지가 나올 수 있다.
서명되지 않은 컨텐츠 어쩌고라는 내용인데 상관하지말고 OK버튼을 눌러 설치를 계속 진행한다.
서명되지 않은 컨텐츠 어쩌고라는 내용인데 상관하지말고 OK버튼을 눌러 설치를 계속 진행한다.

설치가 완료되면 아래와 같이 eclipse를 재시작하라고 메시지가 나온다.
Yes 버튼을 클릭하여 재시작 한다. 잠시후에 자동으로 eclipse가 실행되니 eclipse를 수동으로 실행시키지 않아도 된다.
Yes 버튼을 클릭하여 재시작 한다. 잠시후에 자동으로 eclipse가 실행되니 eclipse를 수동으로 실행시키지 않아도 된다.

이제 이미 설치해 둔 Android SDK의 경로를 설정해야 한다.
Eclipse 메뉴 중 Window->Preferences를 클릭하여 나타난 창에서 Android를 선택한다.
SDK Location 항목의 Browse 버튼을 클릭하여 설치 해 둔 SDK 경로를 선택한다.
Eclipse 메뉴 중 Window->Preferences를 클릭하여 나타난 창에서 Android를 선택한다.
SDK Location 항목의 Browse 버튼을 클릭하여 설치 해 둔 SDK 경로를 선택한다.

이제 Android SDK Component를 설치해야 한다.
아래 화면의 빨간색 테두리 안에 있는 아이콘을 클릭하거나
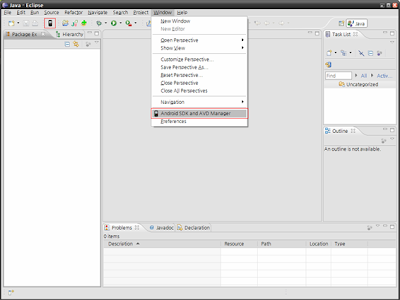
Windows->Android SDK and AVD Manager 메뉴를 선택하여 Android SDK and AVD Manager 창을 오픈한다.
아래 화면의 빨간색 테두리 안에 있는 아이콘을 클릭하거나
Windows->Android SDK and AVD Manager 메뉴를 선택하여 Android SDK and AVD Manager 창을 오픈한다.

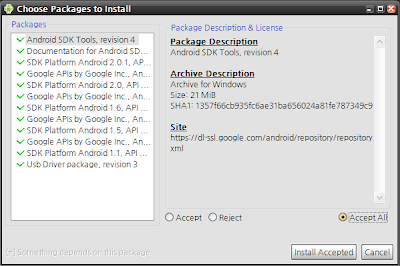
Available Packages에서 빨간색 테두리의 항목을 체크하고 Install Selected를 클릭하여 모든 항목을 설치한다. 꼭 모든 항목을 설치할 필요는 없지만 안드로이드 디바이스들의 버전들이 각각 틀리기 때문에 특정 버전을 타겟으로 하여 개발하고자 한다면 필요로 하기때문에 모든 항목을 설치하기를 권장한다.(2010년 10월 현재 안드로이드 2.2(프로요)가 발매되어 API 8, Version 2.2 까지 다운로드 가능하다.)

아래 화면과 같이 다시한번 설치 할것인지 확인하는 창이 표시된다.
Accept All 라디오 버튼을 체크하고 Install Accepted 버튼을 클릭하여 설치한다.
이때 시간이 꽤 걸린다. 1시간 정도 지나면 설치가 완료된다.
Accept All 라디오 버튼을 체크하고 Install Accepted 버튼을 클릭하여 설치한다.
이때 시간이 꽤 걸린다. 1시간 정도 지나면 설치가 완료된다.

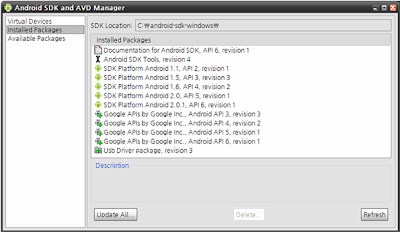
설치가 마무리되고 Installed Packages 에서 설치된 Packages를 확인할 수 있다.

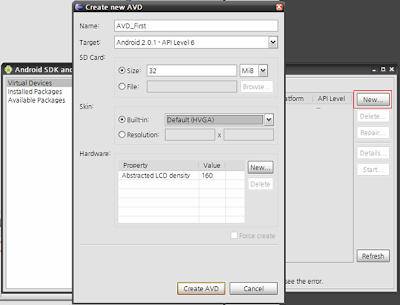
Virtual Devices에서 AVD(Android Virtual Device)를 하나 만들어준다.
AVD가 곧 Emulator이다.
빨간색 테두리의 New 버튼을 클릭하여 Create new AVD 창을 띄운다.
Name, Target, SD Card용량, 해상도, 하드웨어 속성을 설정 할 수 있다.
기본적으로 Name과 Target을 설정한 뒤 Create AVD 버튼을 클릭하여 AVD를 생성한다.
AVD가 곧 Emulator이다.
빨간색 테두리의 New 버튼을 클릭하여 Create new AVD 창을 띄운다.
Name, Target, SD Card용량, 해상도, 하드웨어 속성을 설정 할 수 있다.
기본적으로 Name과 Target을 설정한 뒤 Create AVD 버튼을 클릭하여 AVD를 생성한다.

AVD 생성 결과 다이얼로그가 나타나면, 생성된 AVD를 선택한 후 Start버튼을 클릭하여 AVD 구동하여 보자. 처음 AVD구동하면 약간의 시간이 걸린다. 개발 시 한 번 실행시켜두고 끄지않고 Build하면서 확인해보는 것이 좋다. 아래는 AVD구동 화면이다.

이후 어플리케이션을 만들고 그것을 에뮬레이터에서 실행하면, 바로 위 화면에서 작성한 애플리케이션이 실행되게 된다.
피드 구독하기:
글 (Atom)